Numerous car tasks—from replacing brake cushions to changing a flat—require lifting the car off the ground. Most frequently, this implies employing a jack, which is reasonably straightforward to function but does require a few additional security safeguards to keep you (and your car) secure. We’ll show you how to take those safety measures and lift your car using a jack so you can just get back on the street in no time. Let’s begin reading how to use a car jack.
Do cars come with jacks?
Car companies started including scissor jacks, as well as other jack plans, in the trunks of cars in the 1950s (besides the spare tyre). That practice remained all-inclusive until as of late. Nowadays, most unused cars and trucks still come with a jack and a spare; however, a few models do not save weight and increase fuel economy.
Over the decades, there have been numerous car jack plans utilized by automakers or sold in stores, extending from scissor jacks, also known as screw jacks, to water-powered floor jacks, bottle jacks, and indeed pneumatic car jacks that lift the vehicle with compressed air.
But the most common types used nowadays are the trusty scissor (because of its trunk-friendly compact bundling) and the pressure-driven floor jack, which is utilized more often by car devotees, proficient mechanics, and even NASCAR pit crews.
Related: Basic Car Maintenance Tips for Beginners
Is there a jack-lifting range for diverse vehicles?
Both types of car jacks come in numerous shapes and sizes to lift small cars, heavier expansive cars, and higher-riding trucks and SUVs. If you’re going to purchase a car jack, make sure you get one with the right weight capacity to lift your vehicle securely.
The next size up can handle around two tons of weight and works well with numerous traveller cars.
If you drive a bigger vehicle like an SUV or pick-up truck, you may need to contribute in a sturdier jack with the next weight capacity. The biggest ones can hold up to approximately six tons. Be sure to check that the weight capacity of a jack is satisfactory to lift your vehicle.
Note that there are distinctive ways to calculate car weights — dry weight incorporates just the car itself, control weight accounts for the included weight of fuel, and net vehicle weight consolidates travellers as well. When choosing the leading jack for your car, base your choice on the car’s curb weight.
Costs for jacks extend from around $30 for the lightest-duty scissor jack that can lift one ton, to almost $300 for a high-capacity, three-ton pressure-driven unit made of lightweight aluminium. But you don’t have to spend that much to induce a high-quality pressure-driven floor jack — numerous are accessible for less than $100 online.
How to Use a Car Jack
Follow these steps to gradually learn how to use a car jack:
Park the car on a hard, flat surface.
Always work on a level surface away from moving vehicles to prevent your car from rolling or slipping off the jack. If you’re incapable of discovering one, consider calling a tow service instead. In case you’re working near traffic, use cones, reflective danger triangles, your hazard lights, or flares for additional safety.
If you must jack the car on a delicate or broken surface such as a soil bear, utilize a thick, level piece of wood to create a steady platform for the jack.
In case you must jack the car on a slight incline, park next to the curb and turn the wheels into the control so that they are touching it. This will prevent an out-of-control car from harming others if it slips off the jack.
Essentially, if you do not have anything to piece the wheels with, turn the tyres into the control.
Put chocks or other boundaries under the wheels.
Another step on how to use a car jack is to utilise this aid. Chocks are wedge-shaped pieces made from metal and elastic that keep the wheels from rolling. Set a chock on either side of each wheel at the inverse side of the car from where you intend to lift.
If you do not have chocks, use bricks, cinder pieces, expansive rocks, or wedge-shaped pieces of wood. Moreover, double-check that your car is in the park. Set the stopping brake, and if the car incorporates a manual transmission, put it in the least forward gear.
Find the jack points using the owner’s manual.
Most vehicles have a few strengthened points along the body where the vehicle is outlined to be lifted. In case you lift somewhere else, the car’s weight may cause harm to yourself or harm to the outline. Fortunately, the owner’s manual will almost always tell you where a car’s jack points are.
This will often be next to the rocker boards (the metal or plastic strips beneath the entryways). In some cases, there are two more central jack points found just behind the front and raised bumpers.
In case you’re not sure where the jack points are, seek for a level metal region along the weld running down the side of the car underneath the entryways. There may also be an indent that matches the shape of the top of the jack, a set pattern in the plastic skirt that is uncovered metal, or a sturdy plastic square connected to the frame. There may even be a spot labelled “jack” on the undercarriage.
Position the jack beneath the jack point.
Make sure the proper side is confronting up. If the jack itself isn’t labelled with a “this side up” caution, see your jack’s user manual for visual instructions. Ordinarily, the jack features a wide, level base and a smaller upward-facing arm with “teeth” at the edges indicating up into the body of the car.
Raise the jack so that it touches the car.
Each jack type has diverse working strategies. As the upper arm of the jack nears the underside of the car, make last-minute alterations as required so that it lines up with the jack point.
Each jack type has different working strategies. As the upper arm of the jack nears the underside of the car, make last-minute alterations as required so that it lines up with the jack point.
Also Read: Tips for Reverse Parking
Scissor Jacks:
These are 2 flat metal plates with a diamond-shaped instrument in between. Embed the handle through the gap associated with the main screw drive and turn it clockwise to drag the sides of the jack internally and expand the jack.
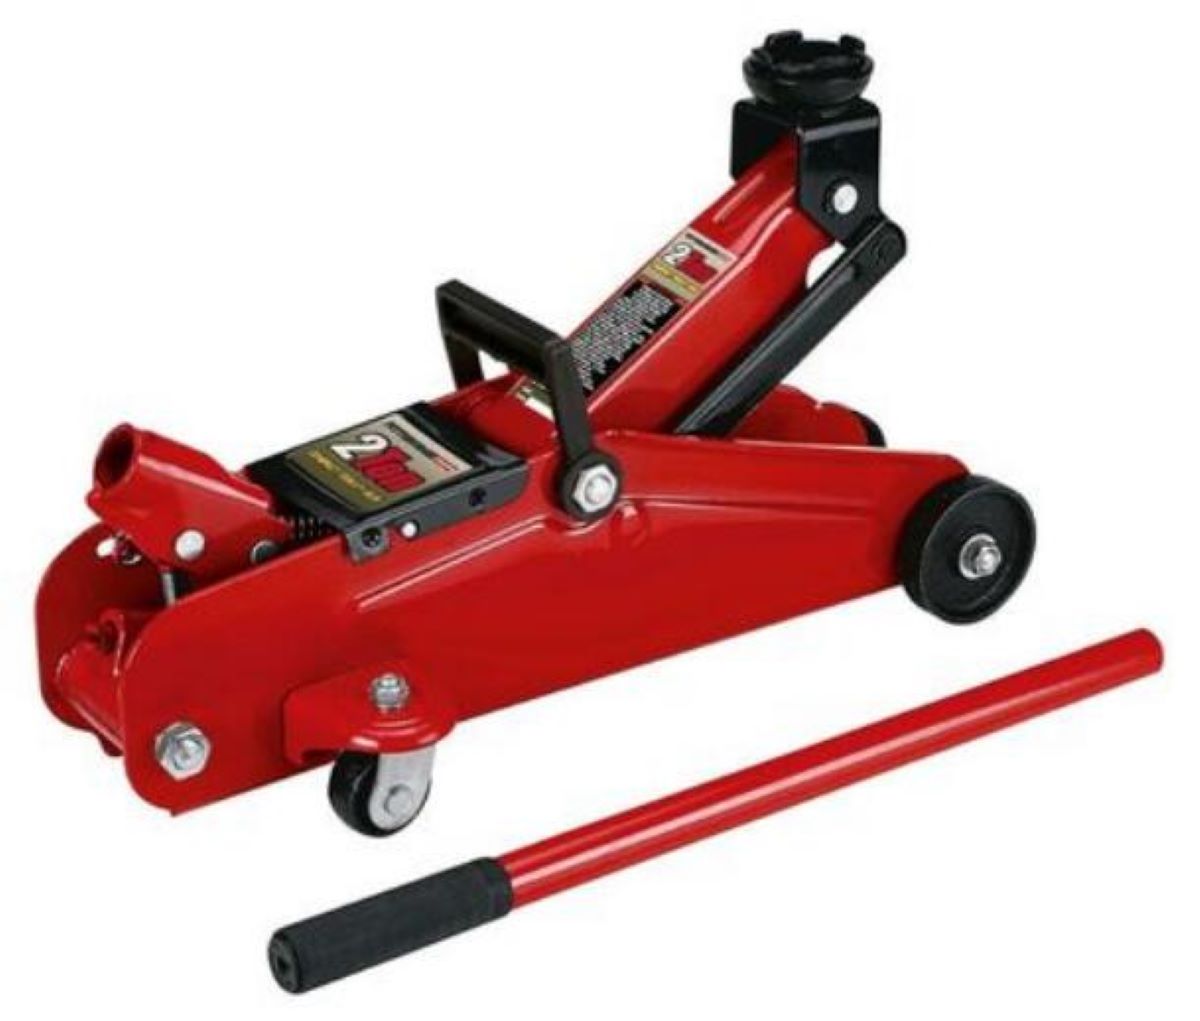
Water-powered Jacks:
Too called bottle or floor jacks. Embed the jacking pole into the opening on one side of the base. Wrench the bar up and down in long, steady strokes to pump pressure-driven liquid into the cylinder and raise the jack.
Utilize the jack handle to lift the car 3–6 in (7.6–15.2 cm). Keep working the jack upward until the closest wheel leaves the ground. Halt when the car has sufficient clearance for you to do your work. For common tasks like changing a tyre, just 3–6 in (7.6–15.2 cm) is all that’s necessary.
Pay cautious attention to any sound or development while lifting the car.
It’s common to listen to a “pop” or a “thud” as the jack shifts somewhat. If this happens, check that it hasn’t slipped out of position before proceeding. Keep all parts of your body out from beneath the car at all times while lifting it. Even though unlikely, serious injury or passing can result if the car slips off the jack after this point.
When the jack makes contact with the underside of the car, it’ll become harder to raise. Keep at it!
Put a jack stand under the car to work underneath it.
Work that requires you to put any portion of your body beneath the car requires a jack stand. Put the jack stand close to the jack and raise it with the stick or screw until it touches the jack point. Lower the jack gradually and carefully until the jack stand “catches” the car.
It is risky to work under the car without jack stands. Jack’s stands to give more steady and dependable support for a lifted car.
Guarantee that the stand, just like the jack, is underneath a jack point or squeeze weld of your car. Utilize numerous jack stands for included soundness, or when lifting the front or raise of the car.
If you’re not working under the car (for instance, if you’re changing a tyre), you may continue without jack stands. Look out not to put any portion of your body underneath the car as you work. Provide the car with a tender thrust to guarantee it’s steady.
Lower the car back down when you’re wrapped up.
At this point, you’re prepared to do anything work you would like to do on your car. When you’re done, gradually lower the car back to the ground and evacuate the jack.
Scissor Jacks:
Slip the pole into the screw drive gap and turn in the inverse course as you did to raise the car—counterclockwise.
Pressure-driven Jacks:
Open the help valve to let liquid deplete from the water-powered barrel, which brings down the arm. The valve is more often than not a small screw keyed to the lever. Beware of opening the valve gradually to maintain a strategic distance from abruptly dropping the car.
If you’re utilizing jack stands, to begin with, raise the car off of the stands, expel the stands, and at long last lower the car.
Read Also: