Numerous individuals are hesitant about car engine cleaning for fear of harming something. That’s a feel sorry for since a clean car motor is a cheerful motor. Cleaning will not only maintain its appearance, but it’ll also keep the motor in great well-being and improve the resale esteem of your car.
Is a Car Engine Wash Safe for the Car?
Hosing a car engine with water will no doubt leave it clean and shining, but doing it off-base may cause your motor a few inconveniences. In this post, you’ll learn how to clean car engine in simple steps with negligible utilisation of water.
Present-day car engines are as of now adequately protected from water, earth and other destructive components, and car motor cleaning isn’t as troublesome as it used to be, particularly with this guide.
Related: How To Use a Car Jack
How to Clean Car Engine
Below are the steps to follow in cleaning your car engine without any professional car assistance.
Expel Soil
To begin with, you need to expel the debris caught in your grille or vent opening. You may notice debris like grass, clears or cotton balls. You may also utilize compressed air or just a handbrush.
Cover Delicate Parts of the Engine
After cleaning the grille and vent opening, cover all the delicate parts like sensors, wholesaler, wiring, and spark box opening with plastic sacks. The engine is waterproof, but this degree is for additional security.
Disconnect the Battery
Make sure that the jolt is in the negative terminal of the battery and the positive terminal is detached for cleaning the battery exterior of the engine.
Apply Motor Degreaser
After covering all the delicate car parts, it’s time to apply a motor degreaser, beginning from the foot. This will guarantee that it doesn’t spill on you. Don’t over-spray the degreaser because it will expel the wax from your bumper.
Allow It Time to Soak
After spaying the degreaser, you need to wait for 3-4 minutes to release everything. If you’ve got a connected degreaser on crevices and nooks then wait for 30 minutes and let it soak for a while.
Wash
Presently, you are all set to flush your car motor. Maintain a strategic distance from using a high-pressure hose since it might disengage a few wires. Instead, utilize a plant hose.
If you still notice dirt after this step, you’ll need to reapply the degreaser and leave it on for 5 minutes more. While cleaning the engine, take care not to spray water right into the motor. This may cause a few genuine harm, like curving or blowing the fuse.
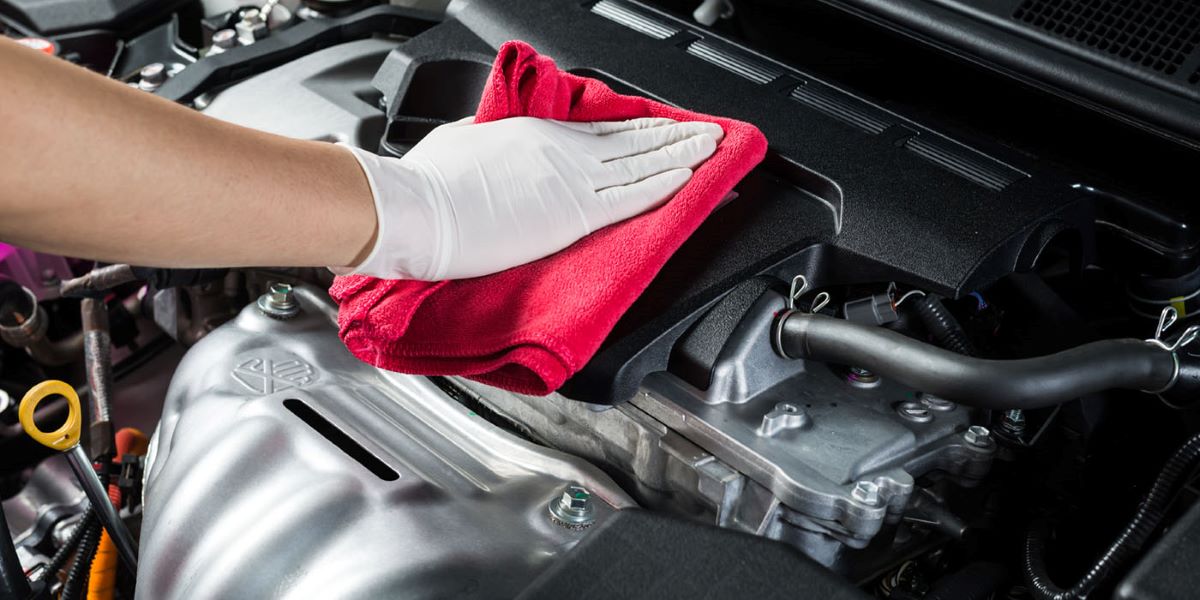
Evacuate the Plastic Covers
After you’re done with cleaning your car engine, it’s time to expel the plastic covers from the delicate car parts. Wipe these parts with a clean and marginally soggy cloth or a microfibre towel.
Dry the Engine
Let it dry and splash with a motor vaporized dressing for that showroom shine.
Secure the electrical framework of the car.
Distinctive components of the electrical system of the car including the battery must be legitimately secured to avoid any major harm by the water to such components.
Detach the battery.
Disengage the battery. Showering water specifically into your engine narrows may cause a few of the electrical components to arc, blowing wires or causing other harm. Avoid this by releasing the jolt on the negative terminal on the battery and sliding the ground cable off of the terminal.
You may select to detach the positive terminal as well to evacuate and clean the battery exterior of the engine cove.
Cover uncovered wiring or gadgets.
While your engine is reasonably waterproof, wrapping plastic around a few electrical components can offer you the next degree of security. Cover the start plug channels, free wires and the merchant cap if your vehicle came prepared with one. Little plastic sacks or plastic cling wraps work well to offer security from water.
Refer to your vehicle’s service manual if you’re uncertain in case it came prepared with a merchant or where to find the start plug channels.
Let the motor run for five minutes.
Let the engine run for five minutes. Oil on the motor will be much less demanding to evacuate when warmed. Start the vehicle and permit it to run for five or so minutes. This will allow the engine to induce to ordinary working temperature and release any stuck-on grime.
Don’t leave the engine running for too long, otherwise you may burn yourself once you start to clean again.
Apply engine degreaser.
There are many brands of engine degreasers you can select from, but most of them tend to work in the same way. Splash the degreaser on the motor from the bottom, as this will guarantee total coverage.
Most degreasers come in a shower bottle to form splashing it on the engine simple and basic.
Avoid getting any degreaser on painted components.
Maintain a strategic distance from getting any degreaser on painted components. Engine degreaser can evacuate clear coat from paint, so take care not to overspray while covering the motor. If you get any degreaser on the bumpers or other painted zones, flush it off rapidly to avoid harming the paint.
Degreaser can evacuate the shine from car paint. Flush degreaser off painted surfaces as rapidly as conceivable.
Permit the degreaser to drench in for three to five minutes.
Motor degreaser works by eating away at the stuck grime on the engine. For reasonably messy motors, three minutes is adequate to release up stuck on grease and oil. For particularly dirty engines, allow the degreaser to drench for five full minutes before rinsing.
If the enlightening on the degreaser you chose states a diverse sum of time, take after the information on your bottle.
After five minutes or so the degreaser will start to trickle off of the motor.
Use a firm bristled brush to clean stuck-on grime.
With the degreaser still drenching on the engine, utilize a firm bristled or steel-toothed brush to clean away at any expansive stores of oil-burned oil or grime. It should break free decently effortlessly with the degreaser already applied.
Wear eye protection while scrubbing the motor to avoid getting degreasers in your eyes.
Wear gloves to avoid prolonged contact with the degreaser on your skin.
You only have to clean the motor if it has abnormally expansive deposits of stuck-on grime.
Use brake cleaner to spot clean grime stores.
The brake cleaner breaks up grime and vanishes rapidly. Embed the straw into the nozzle of the brake cleaner and coordinate it at hard-to-clean spots or ranges where the grime is especially thick. Utilize a difficult-toothed brush to clean the grime away, at that point shower it once more with brake cleaner to flush it.
Be careful using brake cleaner in encased regions as the exhaust can be unsafe.
Brake cleaner is greatly combustible, so do not utilize it while smoking or closing blazes.
Utilize a hardened bristled brush and wipe on plastic parts.
Plastic parts of your motor, such as engine covers and store caps may be troublesome to scrub clean. Begin by employing a firm-toothed, plastic bristled brush along with a car wash cleanser or degreaser. Once the hard-to-expel grime has been expelled, utilize a wipe with a car wash cleanser to induce the last of the grime off before flushing the pieces with water.
You may choose to expel the components to clean them out of the motor inlet, but it isn’t required. Avoid utilizing steel-toothed brushes on plastic because it may cause scratches.
Apply baking soda and water to the battery’s corrosive.
If the battery has erosion caused by spilling battery corrosive, you’ll neutralize it as you clean it by employing a combination of baking soda and water. Pour a bit of heating pop into a bucket of water and blend it all brush in the blend and utilize that to scour the battery terminals and any other ranges corrosive may have leaked.
Baking soda makes for an effective cleaning arrangement as well as a neutralizer for the battery’s corrosive.
Conclusion
There have been a lot of major changes in how modern car engines are made, and how to clean car engine, and these innovations have made cleaning the motor so much simpler.
A plastic covering now covers engines, and electronic connectors are completely secured by plastic lodgings. The only delicate auto parts are the alternators and wiring.
With these straightforward steps, you need not spend a cent to keep your car’s engine squeaky clean.
Read Also: